How To Draw A Rose - Simple Steps For Anyone
Have you ever looked at a beautiful rose and wished you could capture its delicate charm on paper? It’s a common wish, really. Many folks think drawing something so pretty must be super difficult, but it doesn't have to be that way at all. Actually, getting a rose down on paper can be a really enjoyable activity, and it's something almost anyone can learn to do with a little guidance.
This article is here to show you how to make your very own rose picture. We'll go over some easy ways to get started, whether you are just picking up a pencil or you have drawn things before. We will look at different approaches, from simple shapes to adding touches that make your drawing look more real. It's about finding what works best for you and having a bit of fun along the way, you know.
We will walk through the steps, talk about what you might need, and share some helpful ideas that can make your rose drawing come to life. So, if you have ever wanted to sketch this lovely flower, just keep reading. You might be surprised at what you can create, and it's pretty satisfying, honestly.
- Vanessa Marcil
- Reginald Veljohnson
- Jennifer Coolidge Movies And Tv Shows
- Karoline Leavitt Husband
- Leena Sayed
Table of Contents
- Learning How to Draw a Rose - What You Need to Know First
- How to Draw a Rose - Starting with Basic Shapes
- Adding Depth and Realism - How to Draw a Rose's Details
- Can Anyone Learn How to Draw a Rose?
Learning How to Draw a Rose - What You Need to Know First
When you are just beginning to figure out how to draw a rose, it helps to know that there are many ways to approach it. Some people like to follow along with a video, like those you might find with Hadley and Art for Kids Hub. These kinds of videos often break down the process into easy, enjoyable steps, which is really helpful for beginners. You can watch them on a tablet or a mobile device, or even print out the guide onto paper if you prefer. The idea is to make it as straightforward as possible, so you can just focus on the creative part, too.
The goal is to help you create your very own picture of a rose. It does not have to be a masterpiece on your first try. The main thing is to get comfortable with the shapes and lines that make up this flower. You will see that even a rose that looks very detailed starts from pretty simple forms. So, don't worry too much about perfection right away; just enjoy the act of making something lovely, which is actually quite calming.
Gathering Your Tools for How to Draw a Rose
Before you get started on your rose drawing, it is a good idea to have some basic art supplies ready. You really do not need anything fancy to begin. A simple pencil and some paper are often all that is required. For those who want to add more depth, different kinds of pencils can make a big difference. For example, you might use a regular HB pencil, which is a good all-around choice. It makes a line that is not too dark and not too light, sort of a standard. Then, if you want to make some parts darker or add shadows, pencils like 2B, 4B, 6B, and 8B can be very useful. These numbers tell you how soft the lead is, with higher numbers meaning softer lead that makes darker marks, you know.
Having a scrap piece of paper nearby is also a smart move. You can use it to test how dark your pencil lines will be or to see how a certain color looks if you are adding color later. If you are thinking about watercolor for your rose, that scrap paper is even more useful for trying out your paint mixes. So, basically, a few pencils, some paper, and maybe an eraser are what you need to get going on your rose drawing. It is pretty simple, honestly.
How to Draw a Rose - Starting with Basic Shapes
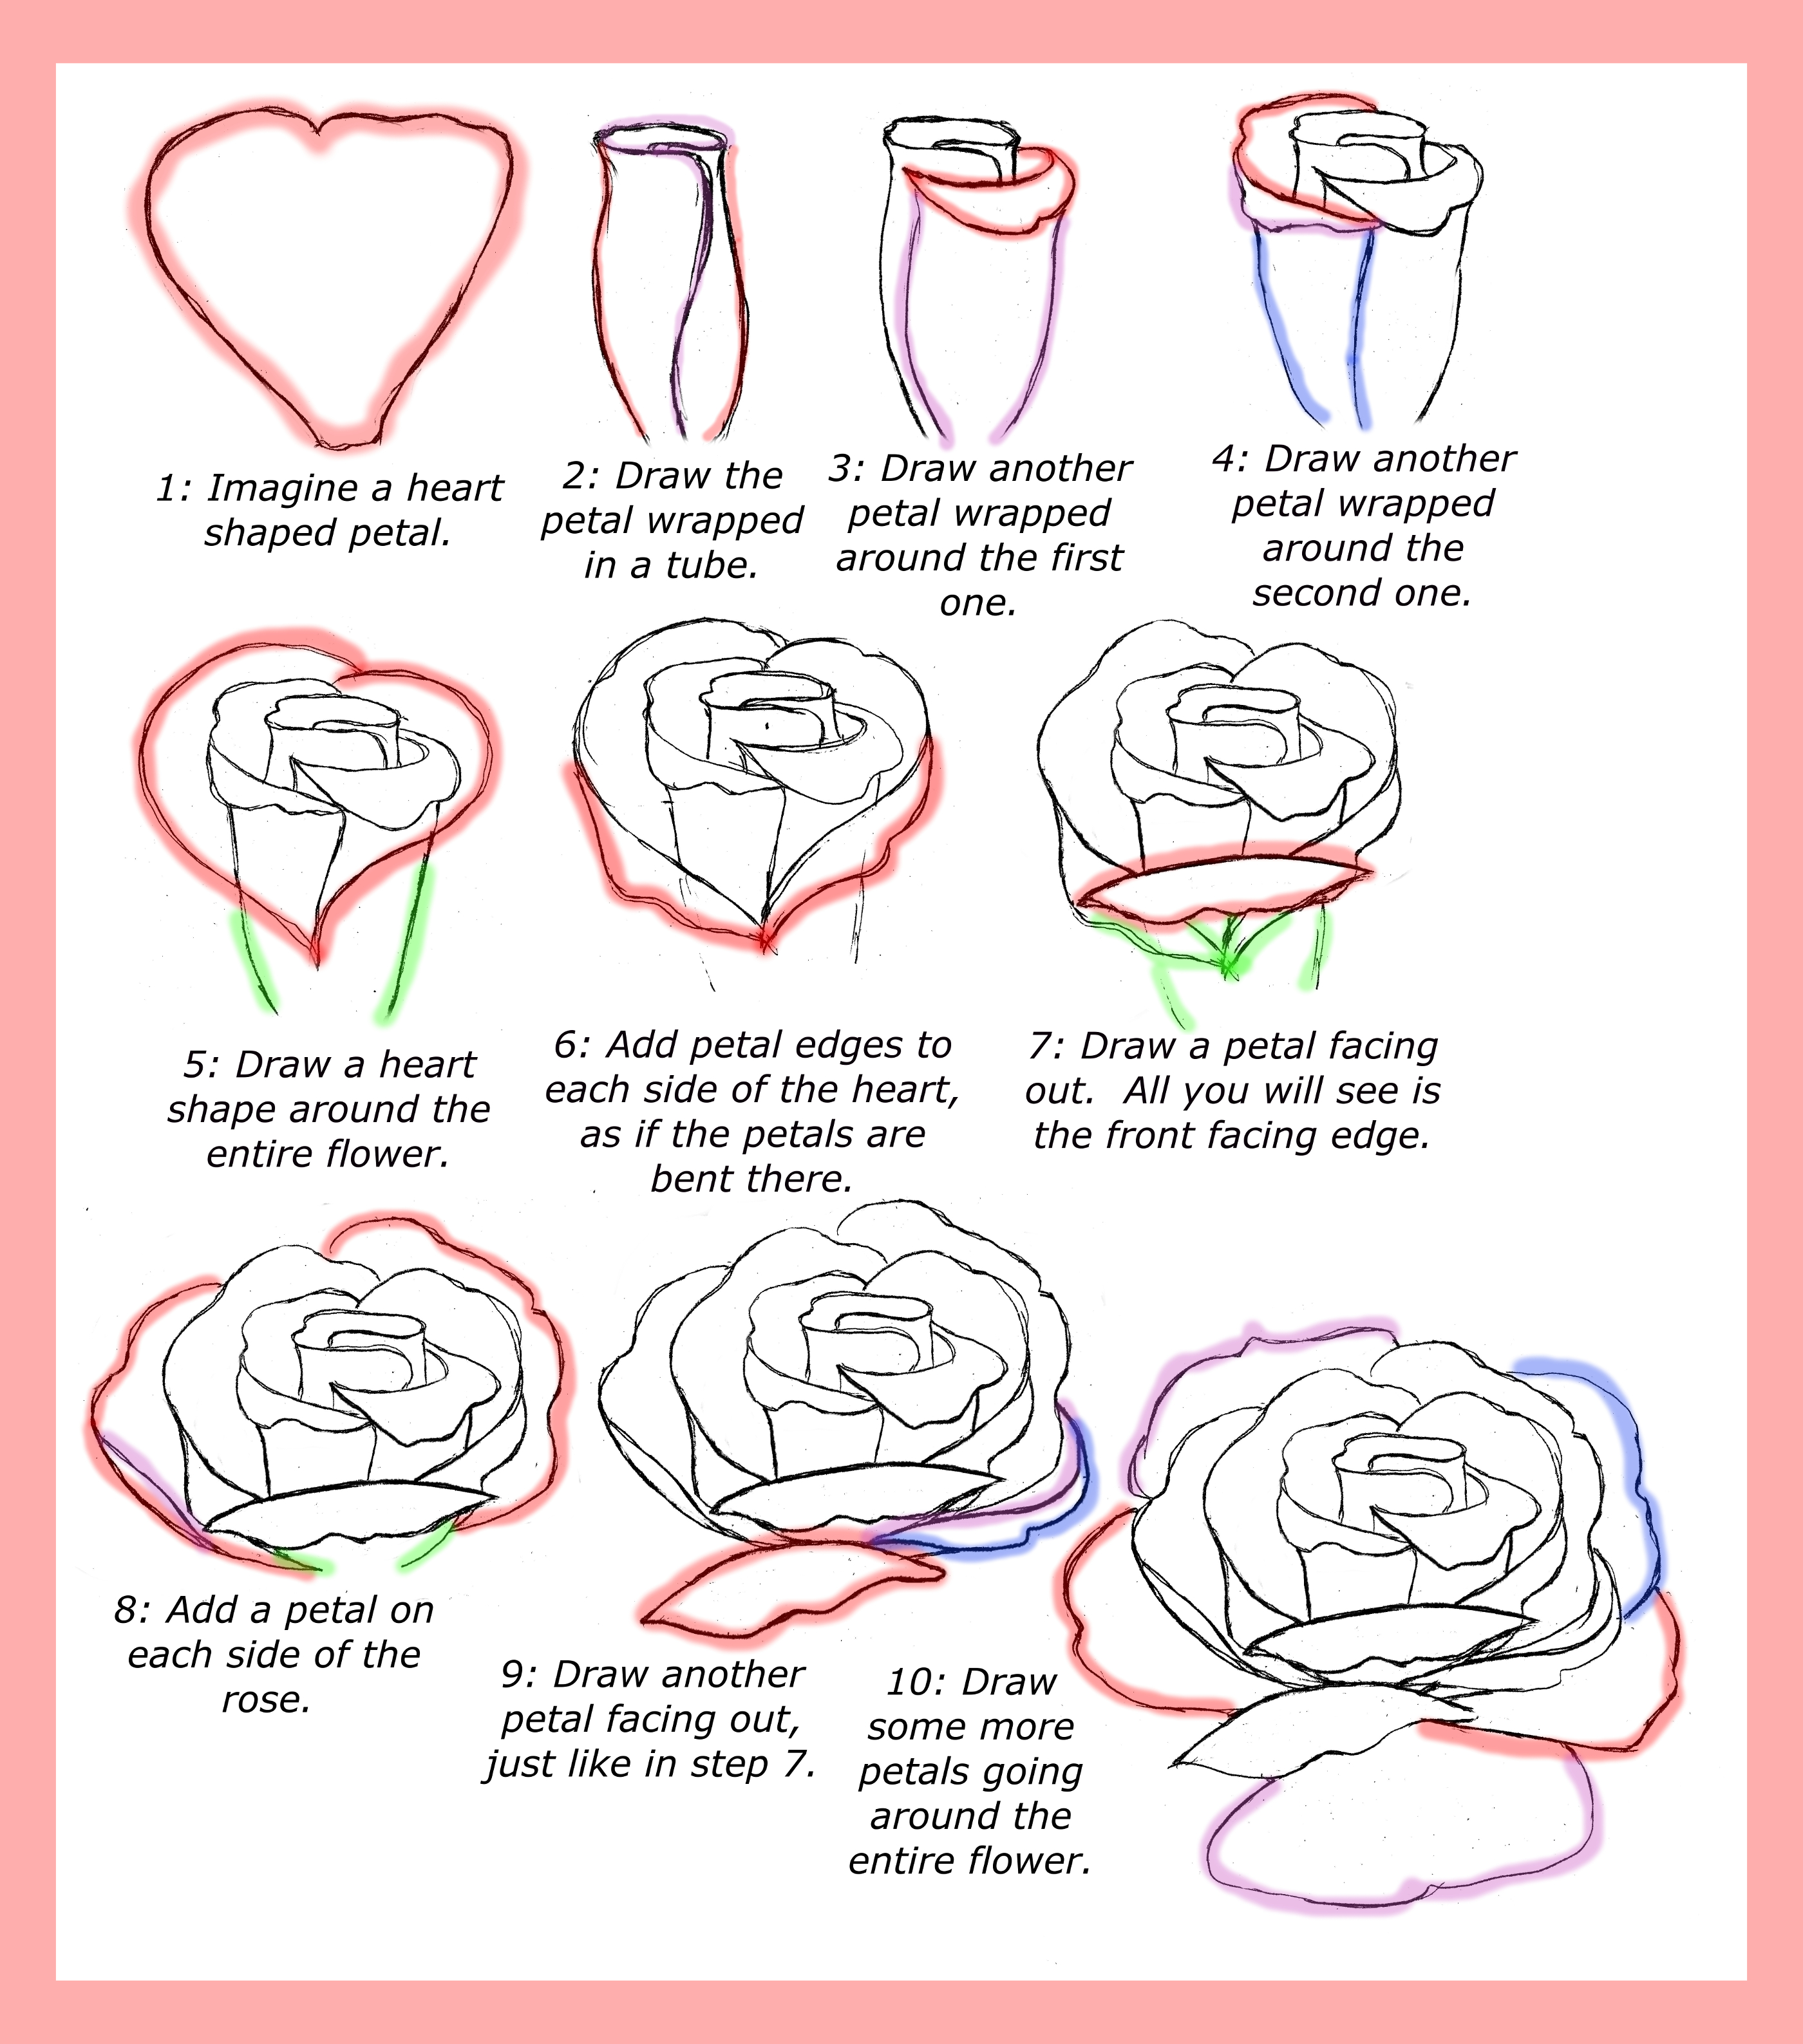
When you begin to figure out how to draw a rose, starting with very simple shapes is a wonderful way to go. One common method is to begin with a basic spiral shape and then build the rest of the flower around it. This spiral can act as the very core of your rose, giving you a center point to work from. Another easy starting point is to sketch out a general flower shape first, kind of like a rounded base, and then add the specific details inside. It helps to give your rose a good overall structure before you get into the smaller bits, you see.
Some guides suggest beginning by drawing three small circles, each one a little bit bigger than the last. These circles can help you place the main parts of the rose. After that, you might draw the very first inner petal, which curves around the smallest circle. This method helps you build the rose from the inside out, which is a rather natural way to think about how a rose grows. It is all about breaking down a complex flower into pieces that are easy to manage, which is a really good approach.
Building the Rose's Core - How to Draw a Rose's Petals
Once you have your starting shapes, whether it is a spiral or some circles, the next step in how to draw a rose is to add the petals. You can begin by drawing some small petals that curve around the central part you made. It is helpful to pay attention to how these petals sit next to each other. They usually overlap, with one petal going slightly over another. This overlapping gives the rose its full, layered look. As you move outwards from the center, the petal shapes might become a little more detailed or varied. This is just how roses are, with their many different petal forms.
You keep working on drawing these petals, slowly and carefully, making them curl around the middle of your rose. As you add more petals, especially those at the top of the flower, you will notice the drawing begins to take on a more complete form. Following a drawing guide or a video can be very helpful here, as they often show you exactly where to place each new petal. After you have drawn the main body of the rose, with its outer petals, you can then add other parts. This might mean putting in the leaves, for instance. For each leaf, you can add a line down its center to give it some shape. If you want your rose to have a stem, just draw two lines going down from the bottom of the flower. These steps build on each other, making the process pretty manageable, you know.
Adding Depth and Realism - How to Draw a Rose's Details
To make your rose drawing truly come to life, adding details is a really important step. When you focus on the little things, like the unique way each petal curves or folds, it can make your drawing look much more real. Think about the texture of the stem, too, or the way the leaves are shaped. These small touches can really improve how your drawing looks overall and make it seem more lifelike. It is about observing the actual flower and trying to put those observations onto your paper, which is pretty neat.
For a realistic-looking rose, you will want to think about the overall shape and then sketch out a basic outline. After that, you can start to draw the actual lines of the rose. Shading is another big part of making a rose look real. This means adding areas of light and dark to show where light is hitting the rose and where shadows are falling. Practice drawing roses with different light sources, like a light coming from the side or from above, and see how the shadows change. This kind of practice helps you understand how light affects what you see, and it is very useful for any kind of drawing, actually.
Why are Shadows Important When Learning How to Draw a Rose?
When you are learning how to draw a rose, including shadows is a really important step for making your picture look real. Shadows add another level of depth to your drawing. Without them, your rose might look flat, kind of like a cut-out. But when you add shadows, you are showing that the rose has form, that its petals curve and overlap, and that light is hitting it from a specific direction. It helps the viewer's eye understand the three-dimensional nature of the flower, which is quite clever.
Thinking about where the light is coming from is the first step in drawing good shadows. If the light is strong from one side, then the opposite side of the petals and the stem will have darker areas. These darker areas are your shadows. You can use different pencil grades, like the 2B, 4B, 6B, and 8B pencils we talked about earlier, to create different levels of darkness for your shadows. A lighter pencil might make a soft shadow, while a darker one can create a deep, rich shadow. It is about making the rose look like it is truly there, sitting in space, and shadows are key to that, very much so.
Can Anyone Learn How to Draw a Rose?
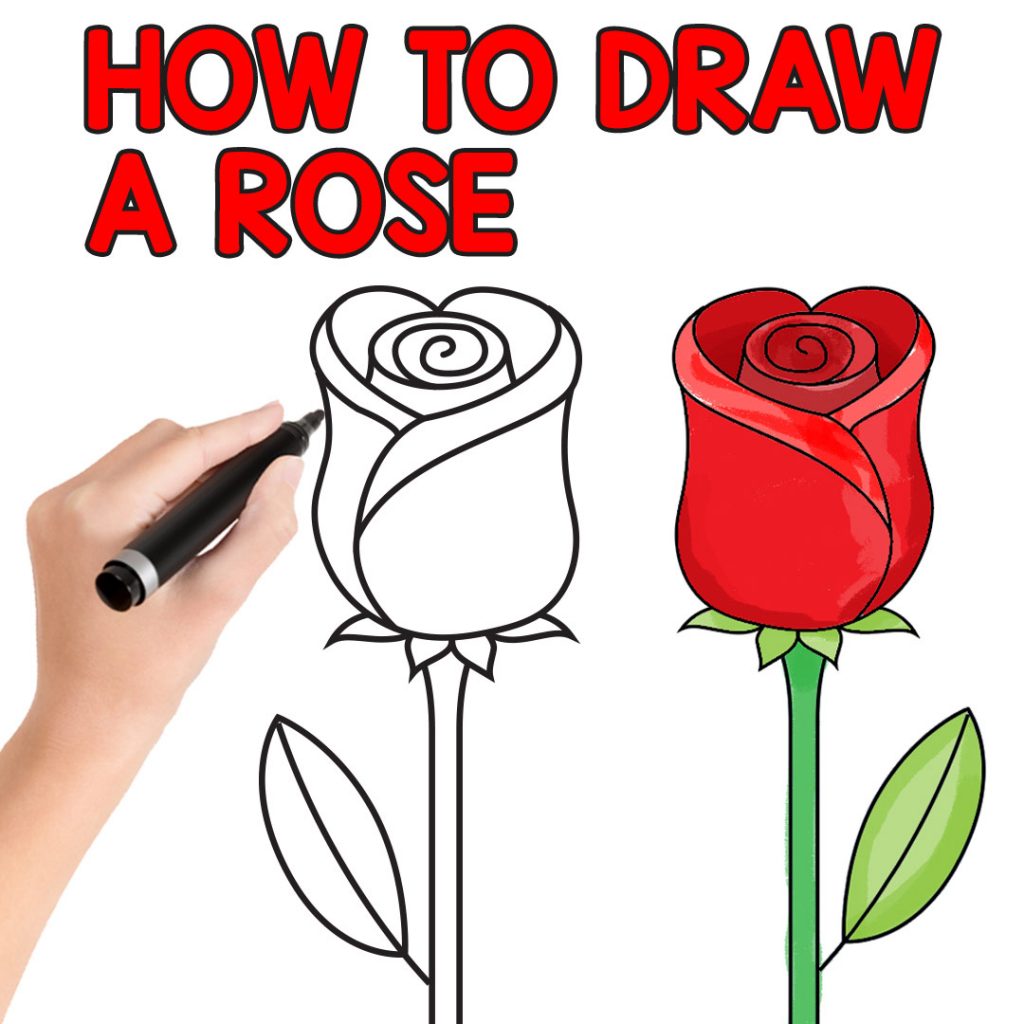
The good news is that learning how to draw a rose does not have to be a complicated thing. Many people find it to be a very approachable skill. There are techniques that make it quite simple, even for those who are just starting out. For example, sketching a very basic rose can be as easy as drawing a "U" shape, then closing the top with a wavy line, and adding a straight line for a stem. This is a quick way to get a recognizable rose shape down on paper, which is pretty encouraging.
The finished product can be really lovely, and the act of drawing itself can be almost like a quiet time, a bit meditative. You do not need to make the edges of your rose jagged or perfectly uneven. You could absolutely draw a rose with smooth, rounded edges if that is what you prefer. There are many ways to make a rose picture, and finding one that suits your style is part of the fun. So, yes, almost anyone can learn how to draw a rose, and it is a rather rewarding thing to do, too.
Trying Out Different Ways to Draw a Rose
There are many ways to approach how to draw a rose, and trying out different styles can be really enjoyable. For instance, if you are hoping to do something a little more unusual, you might try drawing a "neuroart" rose. This style often involves flowing lines and patterns, and it can be a very calming process to create. It is a different take on the traditional rose, and the result can be quite unique. You could also try a black and white rose drawing, focusing purely on lines and shading without the distraction of color, which is a good way to practice form.
When you are drawing, you might start with a light sketch of your rose. This sketch is just a guide, and it is perfectly fine to erase parts of it as you go along. Once you have a refined sketch, you can then draw the actual, final lines of your rose. Some digital drawing programs, like Procreate, even have specific brushes, such as a "bleeding ink brush," that can help you create certain effects for your rose drawing. This shows that there are many tools and methods available to help you bring your rose to life, no matter what your skill level. It is about experimenting and finding what feels right for you, which is really what art is all about, in a way.
Learning how to draw a rose does not have to be a difficult thing. There are many simple techniques that can help you create beautiful flower art in a short amount of time. Whether you like the classic rose shape that builds from a spiral or a more abstract way of drawing, there is a method for every person just starting out. You can begin with basic shapes, add petals, and then work on details like shadows to make your rose look more real. Gathering some simple art supplies, like different pencils, will help you along the way. Remember, it is about enjoying the process and making something lovely, which is a pretty nice thing to do.
How To Draw Roses - Happy Family Art

Drawings of roses: How to draw simple roses step by step (4 ways
How to Draw a Rose - Easy Step by Step For Beginners and Kids - Easy
